
Logo Net At Work

The High Cost of Inaction—A Process Manufacturing Executive’s Guide to ERP Modernization

Manufacturing isn’t what it was five years (or even five months!) ago. Supply chains are shifting, tariffs and trade policies are evolving, and economic uncertainty is forcing process manufacturers to rethink how and where they operate. At the same time, the U.S. is experiencing a resurgence in domestic manufacturing investment, with businesses reshoring production and navigating complex and shifting compliance requirements.

Now more than ever, efficiency is a competitive necessity. Process manufacturers that can pivot quickly, optimize costs, and streamline operations have the advantage. Those relying on outdated ERP systems, disconnected processes, and manual workarounds risk falling behind.

Now is the time to look hard at technology’s role in your business. The question isn’t whether an outdated process manufacturing ERP is costing you—it’s how much.

The Silent Costs of Outdated Technology

The reality is that legacy systems weren’t built for today’s manufacturing challenges. They lack the agility to adapt to fluctuating costs, supply chain disruptions, and the demand for real-time data. Companies that continue to rely on aging technology will struggle to compete in an era where precision, speed, and digital connectivity define market leaders.

Process manufacturing is notoriously slow to adopt change. A recent ERP study found that 70% of chemical companies still rely on technology between 6 and 20 years old, with 30% operating systems over a decade old. These aging ERPs actively slow businesses down. Finance teams spend hours reconciling data, operations teams rely on spreadsheets to track production, and base inventory decisions on incomplete information. Additionally, compliance reporting takes longer than it should, increasing the risk of costly errors.”

At first glance, your legacy ERP inefficiencies may seem minor. The system still runs. Reports get compiled. Orders go out. But behind the scenes, outdated technology slows production, inflates costs, and limits visibility. Instead of driving innovation, your ERP is becoming a constraint.

Technology also plays a critical role in attracting and retaining talent. The next generation of leaders expects intuitive, data-driven systems that provide instant insights. Clunky, outdated software limits efficiency and reduces engagement, making it harder to build a workforce that thrives in a competitive industry.

What Your Competition Is Doing Differently

Industry leaders in chemical and food manufacturing aren’t waiting for their systems to fail before they act. They’re replacing fragmented, outdated platforms with modern ERP solutions that give them real-time insights, automation, and the agility to stay ahead of disruptions.

These companies aren’t just modernizing for the sake of it. They’re seeing tangible returns: streamlined supply chains, better forecasting accuracy, and increased agility in responding to market shifts. Real-time data gives them an edge, allowing them to optimize inventory, improve compliance reporting, and confidently make strategic decisions.

Meanwhile, companies still relying on outdated process manufacturing ERP systems are falling behind. They struggle to integrate new technologies. They react to industry changes instead of leading them. And they pour money into maintaining legacy software that wasn’t built for today’s challenges.

The Risk of Doing Nothing

Many executives hesitate to upgrade their ERP because they see it as a massive, disruptive investment. But staying put isn’t a neutral decision—it’s an expensive one.

IT maintenance costs climb as aging systems require constant fixes. Security vulnerabilities multiply. Compliance risks increase, especially in industries with stringent regulations. And when a legacy system finally fails—whether through an unplanned outage or a vendor discontinuing support—the consequences can be severe.

At some point, upgrading isn’t just an option; it’s a necessity. The real question is whether you’ll make the change on your terms or be forced into it when your current system can no longer keep up.

process manufacturing erp

Future-Proofing Your Business

Technology is evolving at an unprecedented pace. Five years ago, AI-powered analytics and IoT-enabled factories were cutting-edge concepts. Today, they’re becoming standard in forward-thinking manufacturing operations. But here’s the catch—companies still running on outdated ERP systems are often locked out of these innovations.

A modern ERP delivers benefits beyond operational efficiency—it creates the foundation for future technology adoption. It positions process manufacturers to integrate new tools seamlessly instead of patching together disconnected systems. The most advanced ERPs are built with open architecture, cloud connectivity, and AI-driven workflows, making it easier to take advantage of whatever comes next.

Consider the rise of smart factories. Real-time data integration between machines, suppliers, and business systems reduces waste, optimizes production schedules, and minimizes downtime. IoT sensors continuously monitor equipment health, allowing predictive maintenance to prevent costly breakdowns before they happen. AI-powered analytics can identify patterns in supply chain fluctuations, helping companies anticipate and mitigate disruptions before they impact operations.

These innovations aren’t theoretical. They are reshaping manufacturing today. Yet, they are only as effective as the systems they connect to. Legacy ERP struggles to process real-time data, integrate with IoT devices, or leverage AI-driven insights. Without a modern process manufacturing ERP, companies remain stuck in reactive mode, unable to take advantage of automation, machine learning, or digital twins.

And then there’s the unknown. Five years ago, generative AI wasn’t on anyone’s strategic roadmap. Today, it’s transforming everything from predictive analytics to automated workflows. The same will be true for the next wave of innovations. Companies that have already modernized their ERP can quickly adopt and integrate new technologies, while those clinging to legacy systems will be forced into costly, disruptive overhauls just to keep up.

A Modern ERP Creates Opportunity—and Generates ROI

Technology should enable growth, not slow it down. A modern ERP system like Sage X3 provides a foundation for efficiency, scalability, and insight-driven decision-making. Real-time data eliminates guesswork, automation streamlines operations, and cloud-based platforms offer the flexibility to adapt to evolving business needs.

A recent Forrester study revealed that organizations implementing Sage X3 experienced a 213% return on investment (ROI) over three years, with payback periods as short as six months. Some of the specific benefits include:

  • Inventory Reduction: Customers enjoyed a 12% annual reduction in inventory levels, optimizing inventory management and reducing carrying costs.
  • Operational Efficiency: Customers saved 2,080 customer service hours annually, highlighting significant improvements in operational processes.

These outcomes underscore that successful ERP implementations require careful planning, industry expertise, and the right technology partner. Process manufacturers that select systems tailored to their specific industry challenges and collaborate with experienced teams are more likely to achieve these substantial benefits.

Now Is the Time to Act

Every business reaches a point where the systems that once supported growth become a barrier to it. That moment may already be here. If manual processes are increasing, reporting takes too long, and decision-making lacks the data to be effective, it’s time to rethink what your ERP is doing for you.

The best-run companies don’t wait for technology to force their hand. They take control of the future by investing in tools that strengthen operations, improve resilience, and position them for long-term success.

If your process manufacturing ERP no longer supports where your business is headed, let’s talk about your next steps.

Sage X3 Tips n’ Tricks: Troubleshooting “Error 56”

Seeing “Error 56” pop up in Sage X3’s Fixed Assets can be frustrating, but the good news is there’s a straightforward fix. In this week’s Sage X3 Insider blog, we share a question recently asked by one of our Sage X3 clients, then break down the root cause of the issue and share an easy-to-follow process to correct the INDCURPER value and clear the error for good.

Example Client Question:

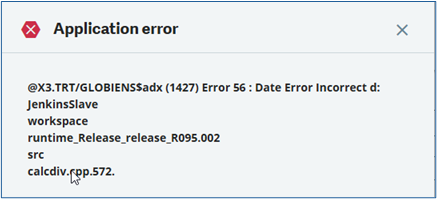
‘When trying to select a Fixed Asset I encountered the error message (Image #1 below) GLOBIEN$$adx (1427) Error 56: Date error incorrect’ Can you help?”

Img1

Img2 1024x588
Solution Provided

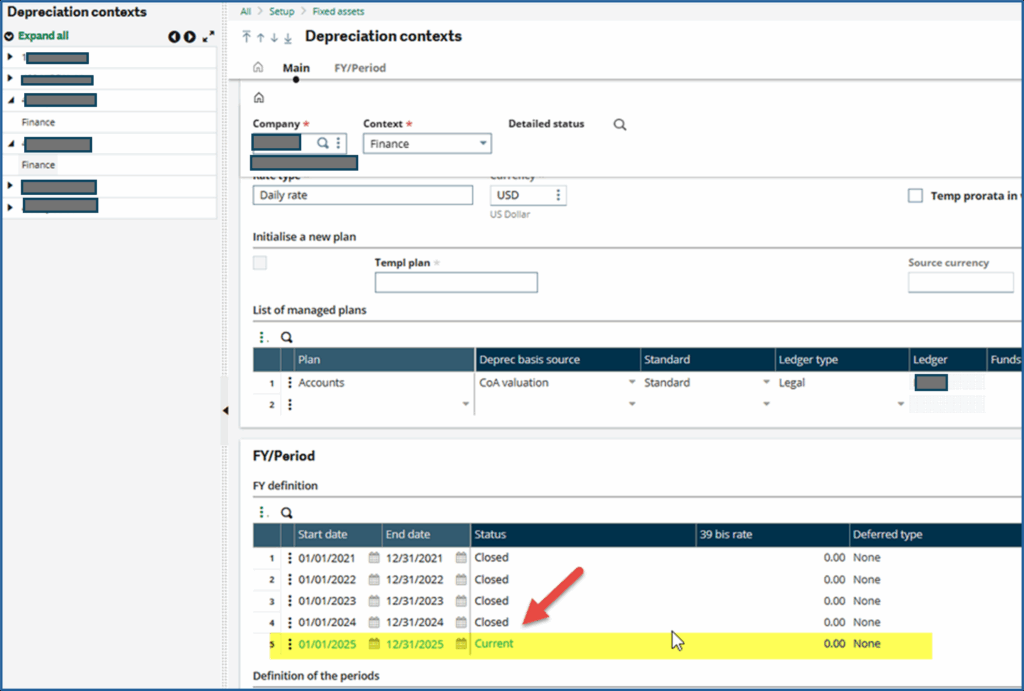
  1. Please go to Fixed Assets Depreciation Context as shown below.
    1. Note – Image #2 above is for training purposes. This Depreciation Context is not specific to any client.
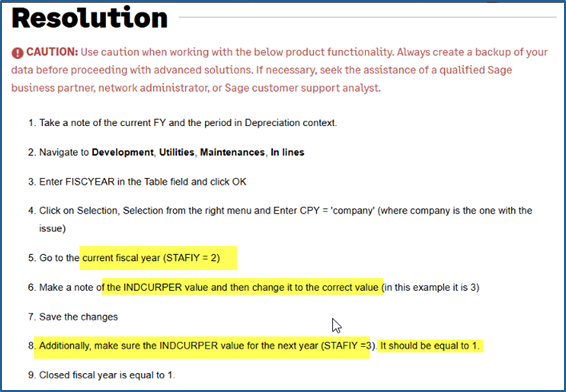
  2. What is the row number for the Current Period of the Company you are fixing?
    1. Note – In the example below (Image #3), its 5.
  3. If your screen shows July 7, then you should use 7
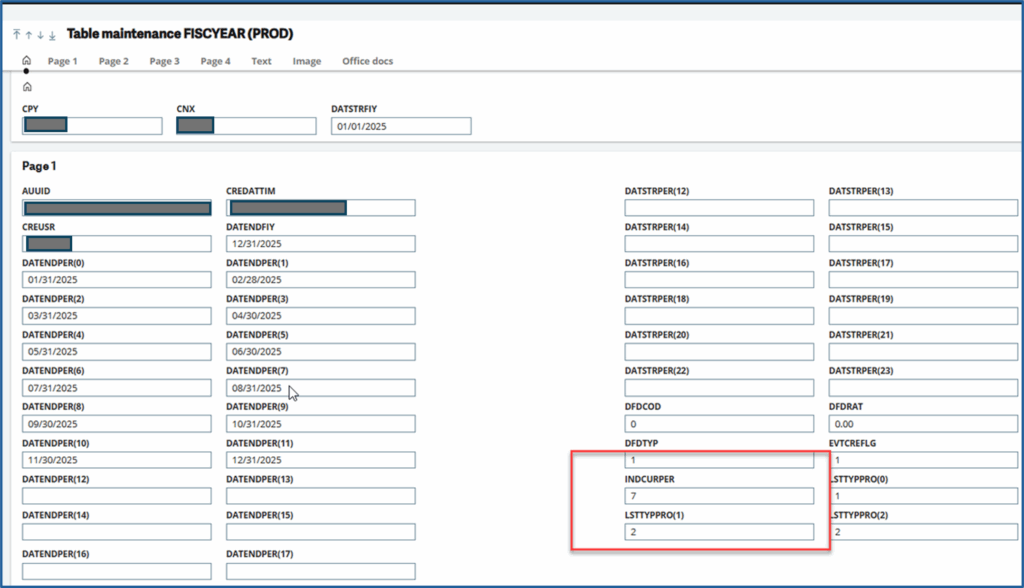
  4. Change the INDCURPER number (after you selected record CPY= ”###” and STAFIY=2) to the period you see labeled “CURRENT”.
  5. Fix the record for the following year (reference the image show below)
  6.  The next year INDCURPER should be set to 1.

Img3 1024x691

Img4

Summary of the Issue:

  • Problem Statement: GLOBIENS$adx (1427) Error 56
  • Root Cause: There is an inconsistency on the current period index of the company
  • Problem Solution: To fix INDCURPER in table FISCYEAR

The problem was resolved by doing the following:

  • Step 1: Make a note of Current period in Depreciation Context
  • Step 2: (Image #4 Above) Go to GMAINT, table FISCYEAR, do a selection, CPY=’###’ and STAFIY=2. Take a screen shot first. Change INDCURPER to Current Period number 5 in this case. Save
  • Step 3: Do another selection, CPY=’###’ and STAFIY=3. Take a screen shot first. Change INDCURPER to 1 in this case. Save
  • Step 4: Go and select “Fixed Assets” for other companies to make sure you don’t have any more errors. If you get another error notification, repeat this process from step 1.

By following these steps, you should be able to quickly resolve the GLOBIENS$adx (1427) Error 56 and keep your Fixed Assets running smoothly. If you run into any challenges or have questions after reading this guide, please reach out to our team for further assistance.

MongoDB “MongoBleed” Vulnerability Mitigation for Sage X3

by Joe Harris, Sage X3 Technical Team Lead, Net at Work

A recently disclosed MongoDB vulnerability (CVE-2025-14847), informally known as “MongoBleed,” impacts nearly all Sage X3 environments. The issue involves a specific MongoDB compression method that may allow an unauthorized client to access memory, and it has been actively exploited in the wild. While the risk is reduced for deployments where MongoDB is protected behind an internal firewall, it is not fully eliminated.  

To address this vulnerability, MongoDB recommends using alternative compression protocols or disabling compression entirely as a workaround. Sage has released hotfix update editions of MongoDB for versions 4, 7, and 8, covering multiple patch levels of Sage X3 V12. For customers who choose not to apply the hotfix—or for earlier Sage X3 versions where no hotfix will be released—Sage recommends updating the MongoDB configuration to disable the affected compression method. Net at Work has tested and validated this mitigation when implemented using the procedures outlined below. 

Please note that applying this configuration change requires restarting both the Syracuse and MongoDB components of Sage X3. This work should only be performed during a planned maintenance window when all users are logged out of the system. 

Part 1: Changes to the mongodb.conf file 

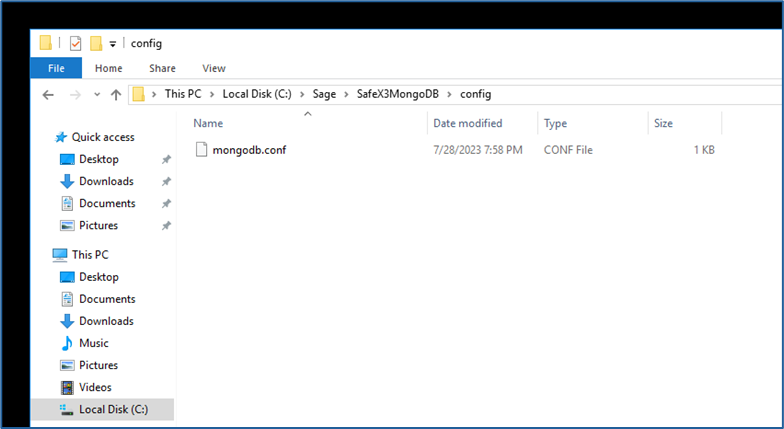
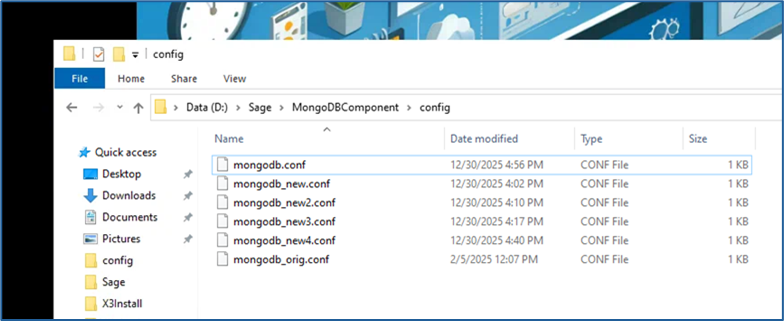
  1. Locate the file named “mongodb.conf” with your X3 instance’s MongoDB installation folder. It will be located in a subfolder named “config” 
    1. Example: Sage\MongoDBComponent\config 
    2. Different releases of the MongoDB component over the years have had different default naming conventions for the component folder. “MongoDBComponent” is the current standard and has been used consistently for the last several years and is the most common variant. If your X3 instance is older, your MongoDB folder may be named something like “MongoDB” or “SafeX3MongoDB” but it should still have a subfolder named “config” and a file named “mongodb.conf”.
      Mognobleed 1
  2.  Copy the file, naming the copy something like “mongodb_original.conf” to save as a backup in case you need to revert to the unmodified version
    Mognobleed 2

    1.  It is imperative that this backup be made before any alterations to the file take place. Any issue with the syntax and layout of the config file will cause MongoDB to not restart successfully. If you are unable to restart the MongoDB service and no solution to the issue can be found, rename this backup as “mongodb.conf” to bring the MongoDB service back online. 
  3. A successful update of this file will require an advanced text editor such as Notepad++. Sage and Net At Work recommend Notepad++ for its wide-ranging utility and typically install it on every X3 server as part of a standard deployment. If you do not have it installed on your MongoDB server, it can be downloaded for free from the publisher here. 
    1. Any other text editor that can display space, tab, and end of line symbols can be used instead if that is preferred, though the rest of these instructions assume use of Notepad++. It is NOT recommended to use standard Microsoft Notepad for this change, as it lacks functionality to validate space and tab formatting. 
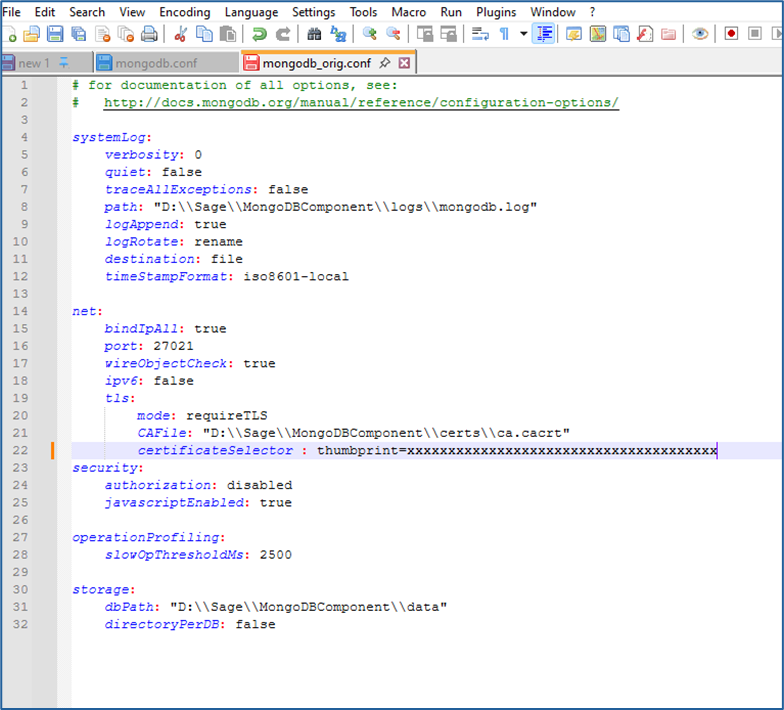
  4. Open the “mongodb.conf” file in Notepad++ 
    1. It should look similar to this, with file paths and folder names specific to your instance:
      Mognobleed 3
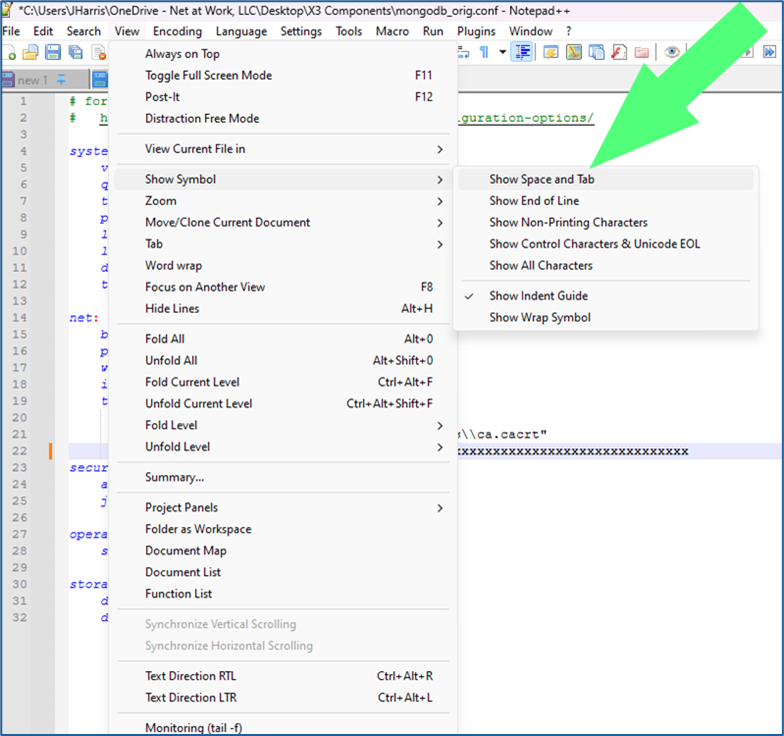
  5.  On the upper tool bar, select View – Show Symbol – Show Space and Tab and View – Show Symbol – Show End of Line
    Mognobleed 4
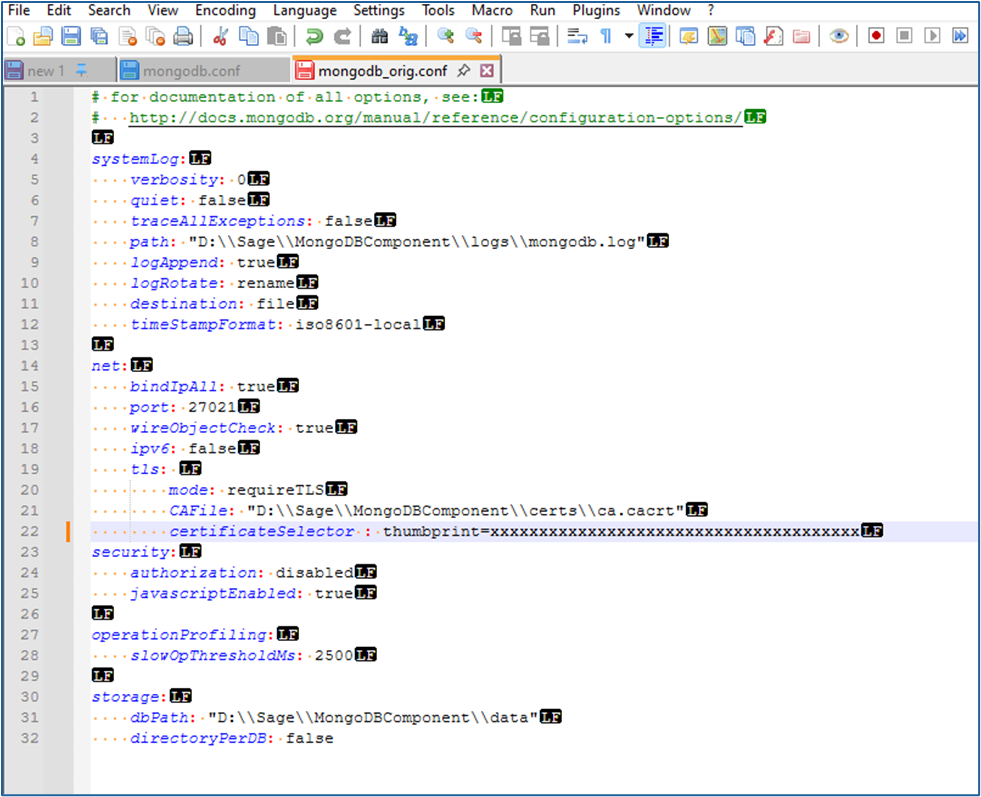
  6.  Once these two views have been selected, your file should appear like the following:
    Mognobleed 5

    1.  You should see yellow dots denoting spaces, and the “LF” symbol at the end of each line 
      1. Some older versions of Notepad++ only allow you to select one additional symbol view or the other. If your version only allows this, download and install the latest version of Notepad++ and use it. Both character views need to be seen simultaneously 
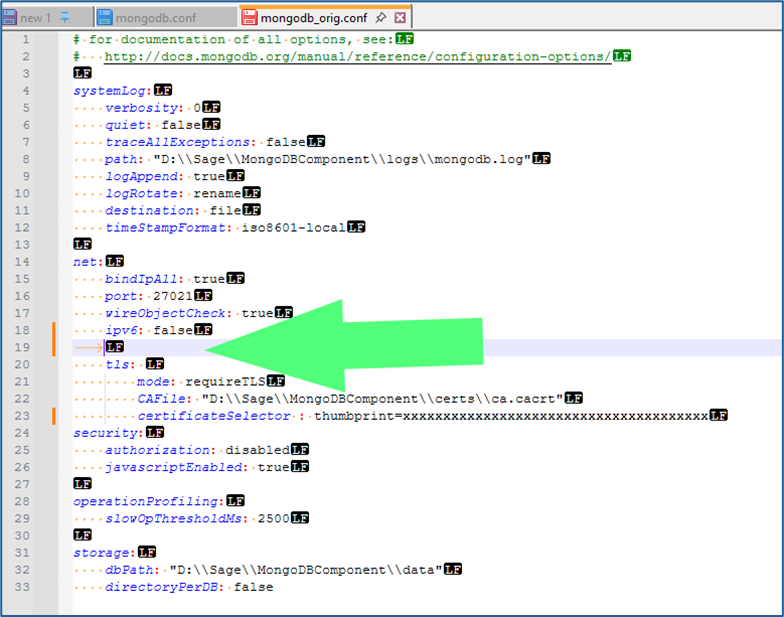
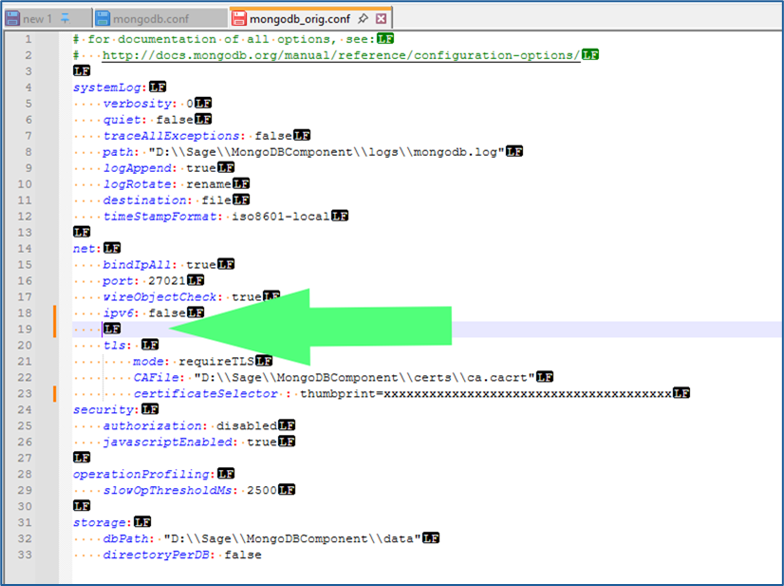
  7. Within the section of the file headed as “net:” and below the line containing “ipv6: false” and above the line containing “tls:” add an additional line.
    Mognobleed 6
     

    1.  NOTE: The new line has been added with a TAB rather than spaces. That’s what the yellow arrow symbol in the screenshot above indicates. The tab now needs to be removed, and spaces added in its place:
      Mognobleed 7
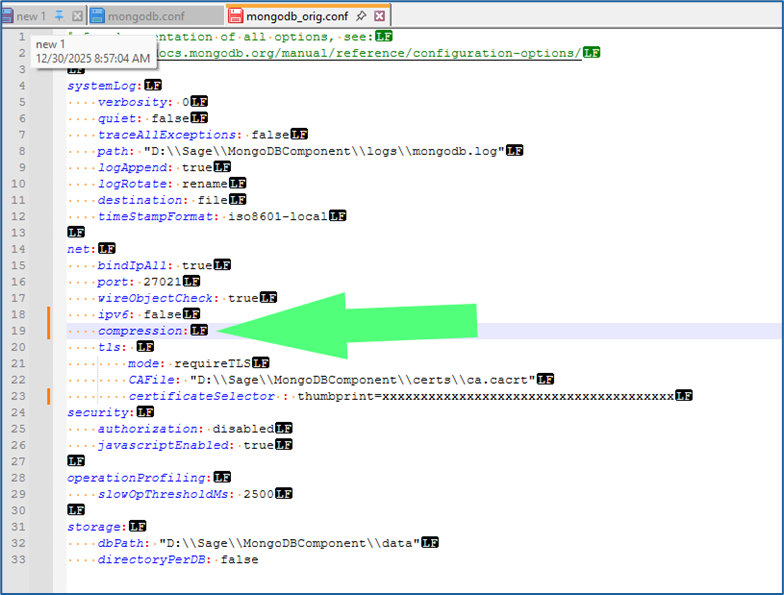
  8.  Add the following on this line, without the quotation marks, but with the colon: 
    1. “Compression:”  
      1. The beginning of this entry should align precisely with the lines above and below it:
        Mognobleed 8
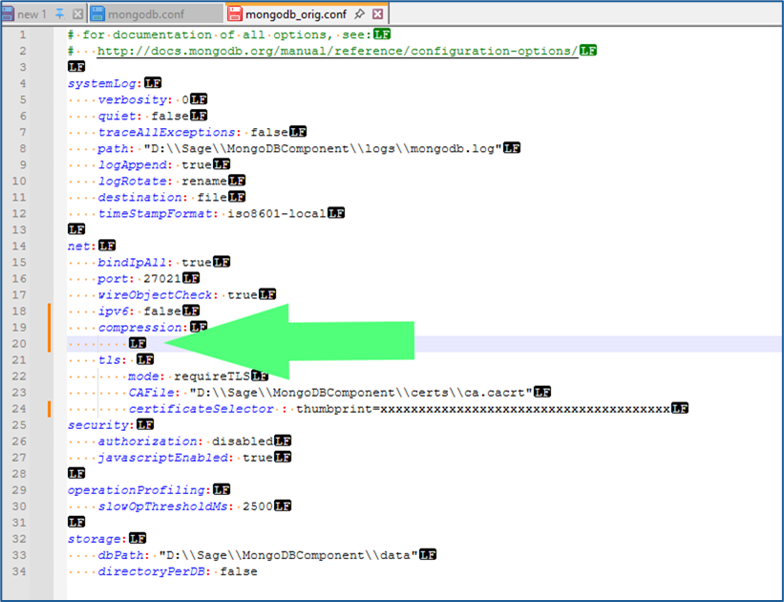
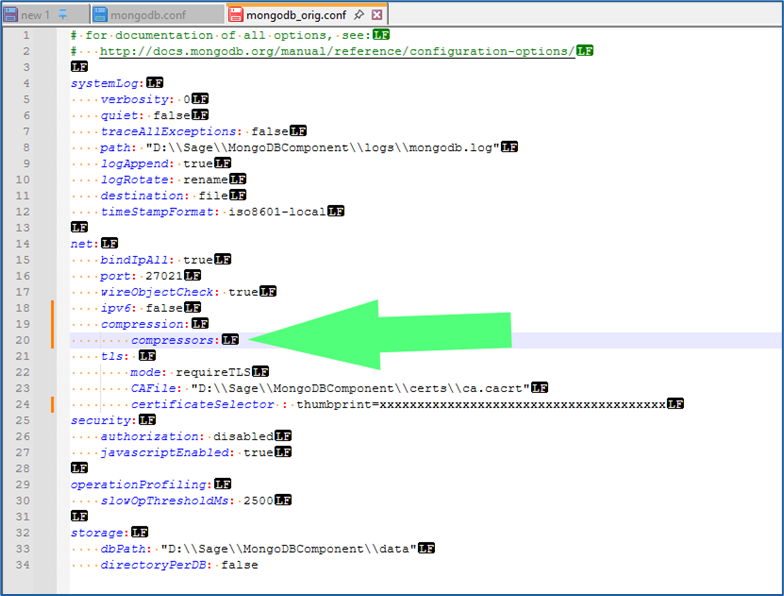
  9.  Add another line below “compression:” and above “tls:” 
    1. Repeat step 7 to remove the tab character and replace with spaces. This line should contain additional spaces so that it aligns with the lines below “tls:” such as “mode:” and “CAFile:”
      Mognobleed 9
  10.   Add the following text, without the quotation marks but including the colon 
    1. “Compressors:”
      Mognobleed 10
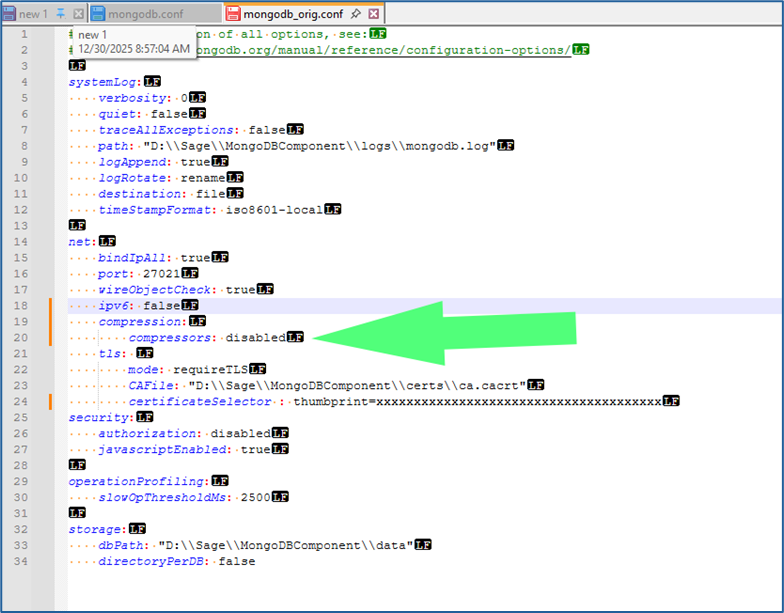
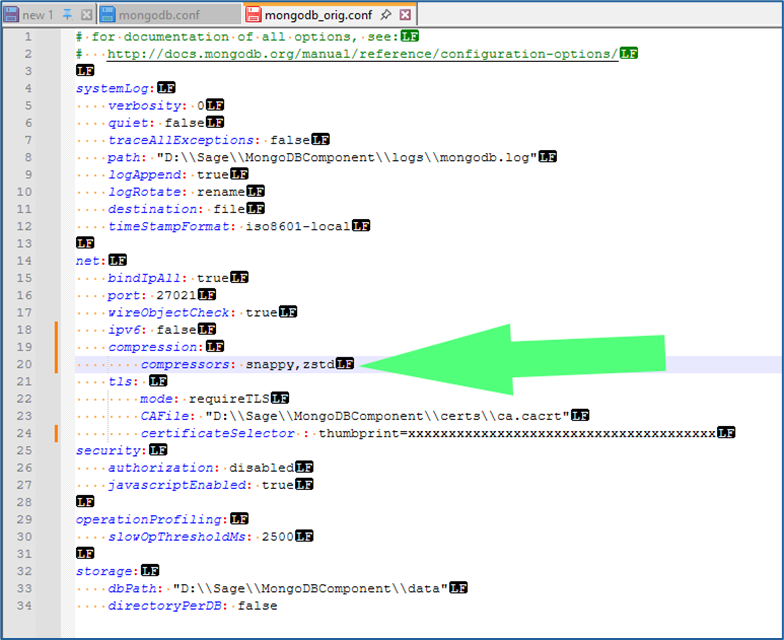
  11. Add the following text, depending on preference and situation, following “compressors:” and a single space (without quotation marks) 
    1. “Disabled” 
      1. Use this to disable all compression by MongoDB. This is Sage’s suggestion for all instances, and Net At Work’s recommendation if your MongoDB instance is on the same server as your Syracuse webhost component, and no other Syracuse webhosts are part of the solutionMognobleed 11
         
      2. “snappy,zstd” 
        1. Use this to allow MongoDB to continue to use the Snappy and ZSTD compression methods, while disabling the ZLIB compression method, which is the one affected by the security vulnerability 
        2. This allows MongoDB to continue using data compression, which it typically uses when communicating across the local network to remote Syracuse instances. Use this method if you wish to continue allowing MongoDB to use compression methods unaffected by the announced vulnerability 
      3. “snappy” 
        1. Some older versions of MongoDB and X3, such as X3 V11, do not include the ZSTD compression method and can only use the Snappy method. Use this and omit the “,zstd” if you are on X3 V11 or older and wish to continue to use data compression in MongoDB
          Mognobleed 12
  12.   Verify that the correct spacing, alignment, and line returns are in place so that it matches the example screenshots exactly. Misaligned spacing, incorrect positioning, or the presence of tabs instead of spaces will prevent MongoDB from running 
  13. Save the updated file 
    1. Note that the updated configuration will only go into effect once the MongoDB service has been restarted. It does not go into effect immediately. 

Part 2: Shutdown of X3 and Components

  1. The following procedure is for how to perform a clean shutdown of X3. This should be done prior to restarting MongoDB to pick up the modifications to the config file to mitigate the vulnerability. If you are already familiar with this process, you can skip to section three. 
  2. Log into X3 and access your Production folder. 
  3. Use the compass icon above to get to the X3 Menu 
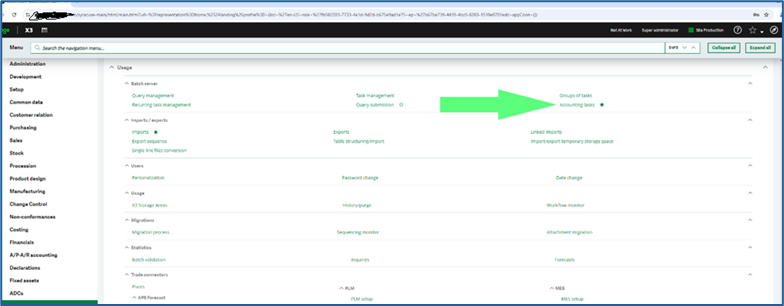
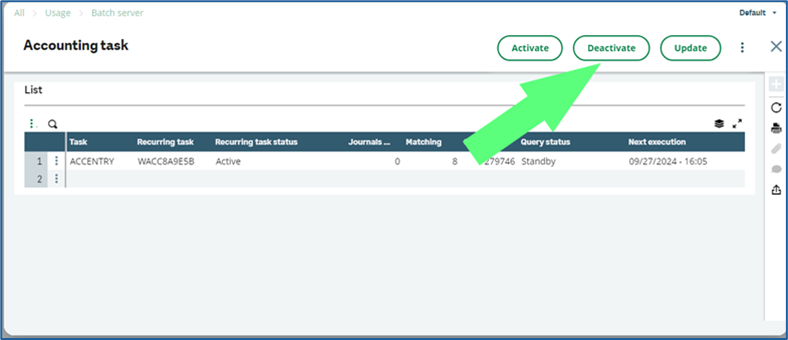
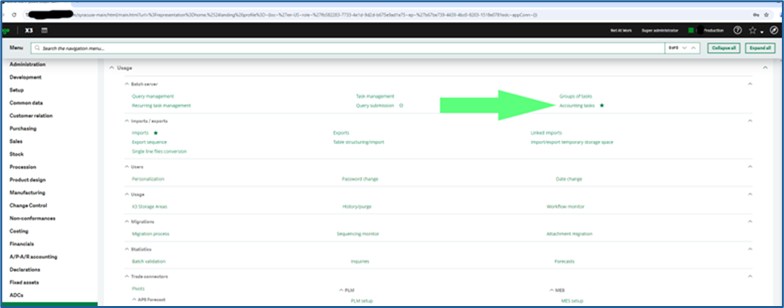
  4. Navigate to Usage>Batch Server > Accounting tasks
    Mognobleed 13
  5. Click the Deactivate button
    Mognobleed 14
     

    1.  Use “X”  the  button to back out of the Accounting task screen 
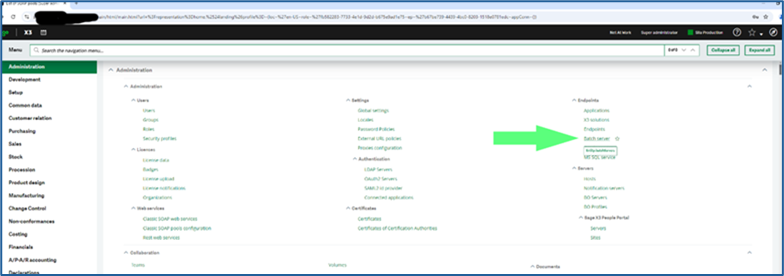
  6. Navigate to Administration > Endpoints > Batch server
    Mognobleed 15
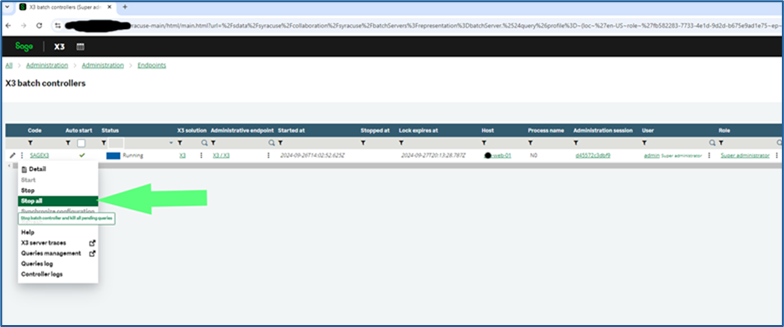
  7.  Click on the 3 vertical dots and select “Stop All” to stop the batch server
    Mognobleed 16
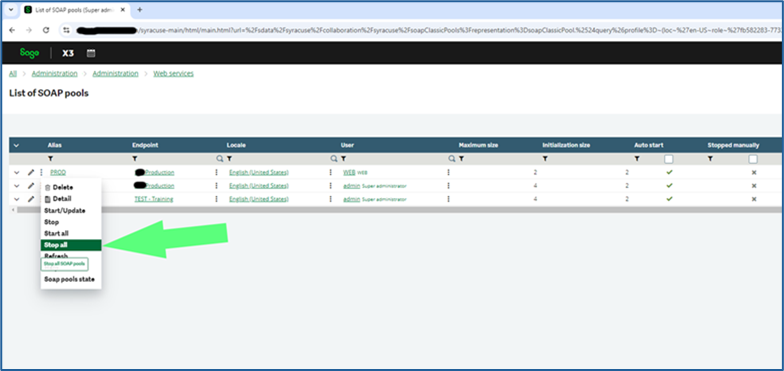
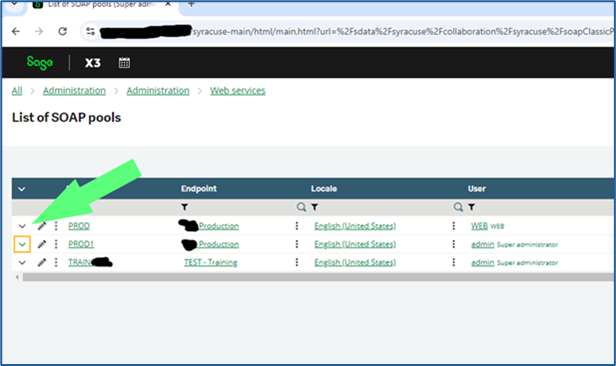
  8.  Stop WEB Pool Services
    Mognobleed 17
     

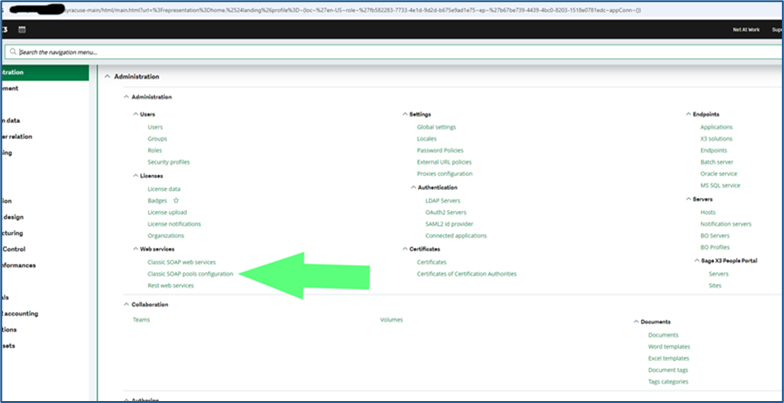
    1.  X3 -> Administration -> Administration -> Web services -> Classic SOAP pools Configuration 
    2. Select the triple dots on each of the listed pools that have the \/ icon (indicating that they are running) next to Alias and click StopMognobleed 18
       

      1.  Click the Trashcan icon on each of the notification windows once each has confirmed stopped to clear the message from your screen. 
  9. Connect to the Windows desktop of your Syracuse server (or servers) 
  10. Open Services.msc 
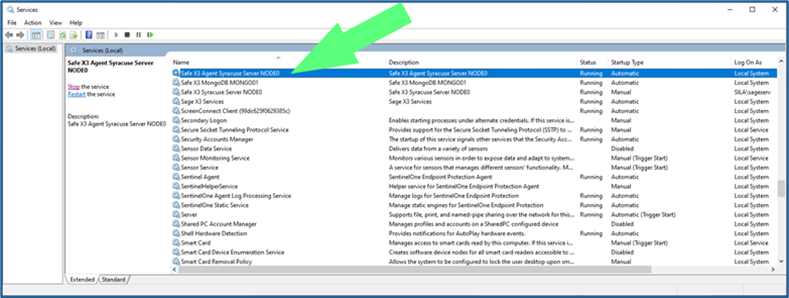
  11. Stop the Syracuse service 
    1. For versions of X3 prior to V12 P36, there are two services, one named “Safe X3 Agent Syracuse Server NODEx” and one named “Safe X3 Syracuse Server NODEx” 
      1. The “x” in the names above represent a number, usually 0 but sometimes 1, 2, 3, 4, etc.
        Mognobleed 19
    2.  Stop the service named “Safe X3 Agent Syracuse Server NODEx” 
    3. This service controls the “Safe X3 Syracuse Server NODEx” service as well – stopping the Agent service will also stop the NODEx service. 
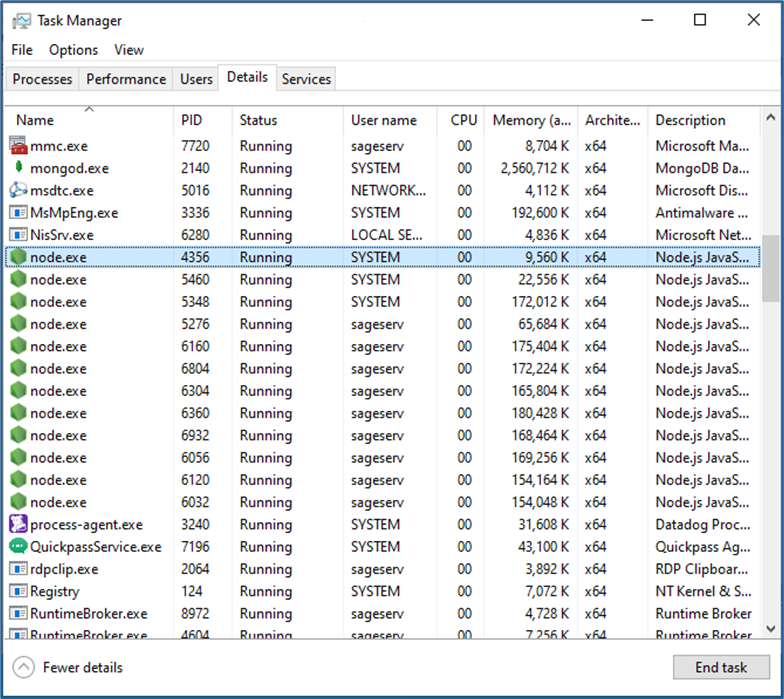
    4. If this service hangs up during the stop procedure, open Task Manager, go to the Details tab, select each instance of the “node.exe” process, and click End Task
      Mognobleed 20

      1.  ONLY perform step 2 above if the two Syracuse services do not successfully stop on their own 
    5. For versions of X3 after V12 P36, there is only one service named “Safe X3 Syracuse Server NODEx” 
      1. The same procedure as above can be performed while stopping only this service 
  12. If you have multiple Syracuse host instances in your X3 solution, repeat step 23 on all servers prior to proceeding with shutdown of MongoDB 
    1. If you also have a “Sage X3 Services” instance, stop this as well before proceeding 

Part 3: Stop and Restart of MongoDB Service

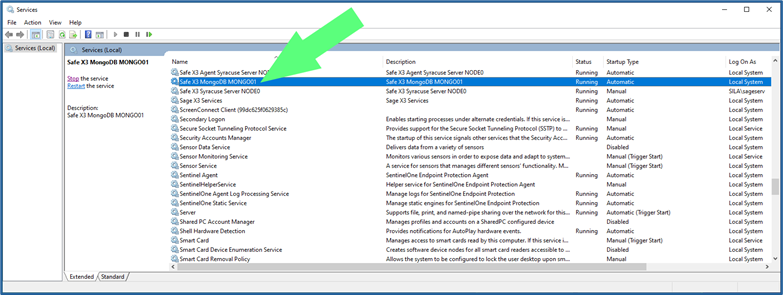
  1. Once all Syracuse and associated processes have been stopped on all servers, it is safe to restart MongoDB. 
    1. Stop the service named “Safe X3 MongoDB MONGOxx”
      Mognobleed 21
  2.  Start the Safe X3 MongoDB MONGOxx service 
    1. If you get an error when attempting to restart this service, it is likely that there is a configuration, layout, or bad character in your revised “mongodb.conf” file 
    2. Re-verify the changes made in section I above 
    3. If you are still unable to restart MongoDB, change the name of your revised “mongodb.conf” to something like “mongodb_new1.conf” and rename the backup copy created in step 1 as “mongodb.conf” 
      1. This will rollback the config change made and will not mitigate the vulnerability, but it will make X3 functional again. 
  3. Once the Safe X3 MongoDB MONGOxx service is running again, you can restart all Syracuse services on all servers 
    1. Also restart Sage X3 Services if present after all Syracuse services have been restarted 
  4. Once Syracuse has restarted successfully, log back into X3. 
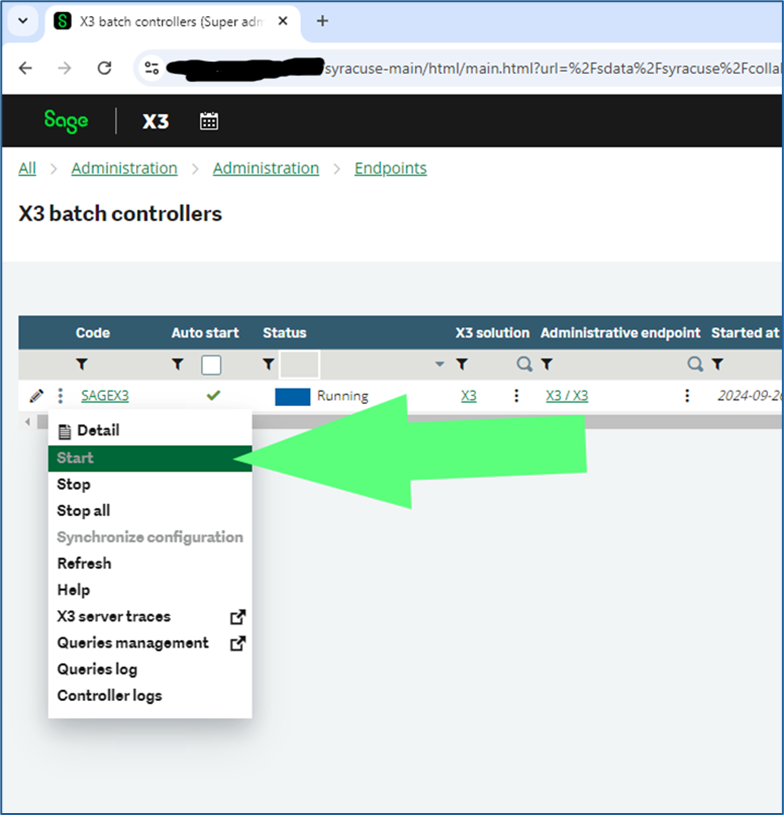
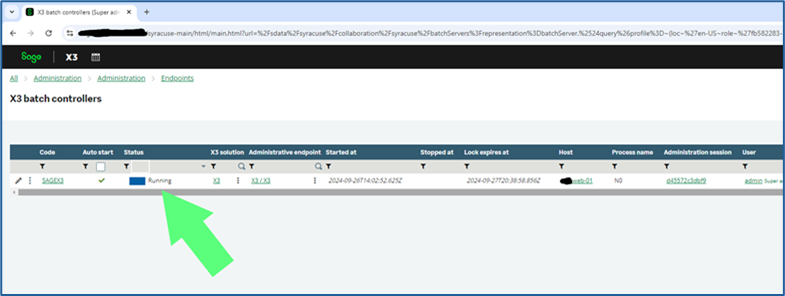
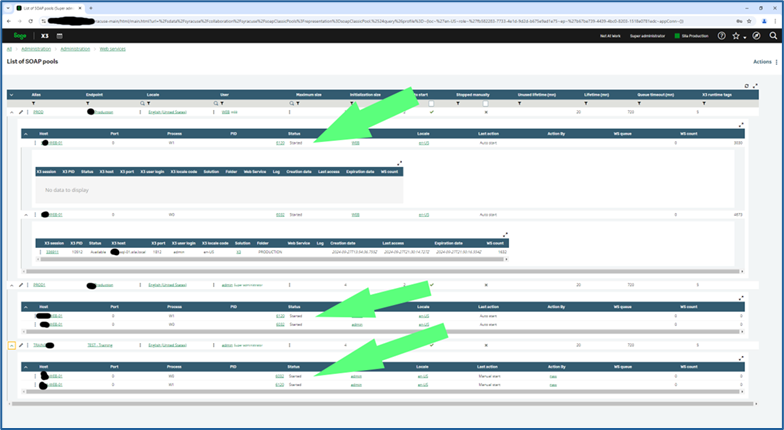
    1. Check that the batch server and all SOAP pools that are set on Auto Start have started running again. They are supposed to after a Syracuse restart. 
    2. If they did not, click the three dots as in section II above next to their names and click “Start”
      Mognobleed 25 Mognobleed 24 Mognobleed 23 Mognobleed 22
    3.  Go back into Usage > Batch Server > Accounting tasks  
    4. Click the Accounting task button
      Mognobleed 26
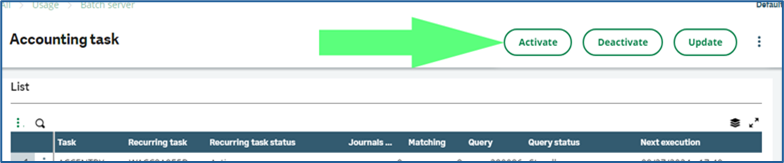
    5. Click the Activate button
      Mognobleed 27
    6.  Use “X” the  button to back out of the Accounting task screen 

Upon completion of these steps, your Sage X3 environment should be successfully mitigated against the MongoBleed vulnerability. If you encounter any issues, we recommend reviewing each step carefully to confirm configuration accuracy. Should you require assistance at any point, the Net at Work Sage X3 technical team is available to support you. 


Client Technical Xperience Plan (CTXP) for Sage X3

Stay Focused on Your Business. We’ll Handle System Performance

Ensure your system remains secure, stable, and optimized with Net at Work’s CTXP for Sage X3. Our proactive approach helps prevent issues before they arise, keeping your business running efficiently and securely.

Monthly Technical Reviews

Stay ahead of potential risks with a proactive assessment of your system’s health. Our monthly technical reviews provide:

  • Actionable Insights – A structured report outlining areas that require attention before the next review.
  • Completion Notification – An email confirmation detailing the process and next steps.
Quarterly Preventative Health Check

A comprehensive deep-dive into your system’s performance, security, and overall health to help ensure it continues to run efficiently.

  • Comprehensive Report – Insights from past reviews, performance metrics, and key findings.
  • Expert Recommendations – Tailored guidance on optimizations, security enhancements, and best practices.
  • Strategic Review Meeting – A dedicated session with our ERP specialists to discuss findings and align strategies with business goals.

Sage X3 License and SSL Certificate Update

We proactively manage your Sage X3 licenses and SSL certificates to maintain system functionality, security, and compliance. Helping to minimize disruptions and protecting your business from potential risks.

  • License Renewal & Validation – Acquisition and installation of Sage X3 license keys to ensure uninterrupted access.
  • SSL Certificate Renewal & Installation – Securing encrypted connections to protect sensitive data.
  • System Compatibility Check – Pre-update verification to prevent conflicts and ensure seamless transitions.
  • Testing & Validation – Post-update checks to confirm successful licensing and security configurations.
  • Completion Notification – A confirmation of updates performed.

Folder Refreshes

Maintain an accurate, up-to-date test environment with two folder refreshes included per year and more available upon request. This allows your team to safely test new configurations, troubleshoot issues, and validate changes before deployment. Thereby reducing risk and ensuring smooth upgrades.

  • Full Endpoint Replication – A secure and accurate copy of your production endpoint is transferred to the test environment, ensuring data integrity and consistency.
  • Environment Configuration – Adjustments to database connections, system parameters, and integrations to align with test environment requirements.
  • Validation & Integrity Checks – Post-copy verification to ensure data accuracy, proper system functionality, and alignment with expected configurations.
  • Completion Notification – A notification of refresh performed.

CTXP Features & Schedule

X3 Insider01

Proactive Maintenance. Expert Support. Total Peace of Mind.

With Net at Work’s CTXP for Sage X3, you benefit from ongoing system optimization, preventative maintenance, and expert guidance. Experiencing total peace of mind as a result.

Ready to Get Started?

Leave the complexity, security risks, and budget constraints of constant maintenance to Net at Work. Whether you’re looking to reduce costs or improve security, the CTXP Plan for Sage X3 is the obvious choice. Contact us today.

Customize Your View: How to Add Header Fields to your Left List in Sage X3

Customizing the left list in Sage X3 is a simple way to make your workspace work better for you. By adding the fields that matter most to your daily tasks, whether you are managing orders, invoices, or inventory, you can quickly see the information you need without extra clicks or searches.

Here are seven great reasons to enhance your left list with header fields.

1. Faster Filtering and Navigation

Quickly narrow down records without opening full search dialogs. This reduces time spent scrolling or manually searching through large datasets.

2. Improved Data Visibility

Display key fields such as status, customer name, site, or date for instant context. This helps users identify relevant records at a glance.

3. Supports Role Specific Workflows

Finance, logistics, and sales teams can each tailor their view to highlight what is most relevant to their daily tasks.

4. Better Decision Making

Having filterable fields such as “Order Status” or “Priority” visible helps users act more quickly and with greater accuracy.

️ 5. Reduces Errors

Easier filtering reduces the chance of selecting or editing the wrong record. This is especially valuable in high volume environments like order entry or inventory management.

6. Boosts Productivity

Streamline repetitive tasks such as checking open orders, pending invoices, or stock levels. Fewer clicks mean more time for higher value work.

7. Supports Custom Business Logic

If your organization uses custom fields such as region codes or internal flags, adding them to the left list makes them visible and actionable. This enhances the value of your existing Sage X3 customizations.

Adding Header Fields to the Left List

To make this customization, follow these simple steps:

  1. Go to Setup > General Parameters > Personalization > Objects
  2. Find the object for the document type you want to modify
  3. Select the Action button on a line and choose Insert
  4. Add the field you want to appear on the left list
  5. Click Save (no validation needed)

Picture1

We hope you enjoyed this week’s X3 Insider Tips & Tricks blog. More helpful insights are on the way, so be sure to keep an eye out for future editions. In the meantime, if you have any questions about getting the most from your Sage X3 system, don’t hesitate to reach out. The friendly experts at Net at Work are always here to help.

A Faster, More Secure Way to Support Your Sage Environment

At Net at Work, we are always looking for better ways to support our Sage X3 and Sage 500 clients. That means making support faster, simpler, more secure, and easier to manage when you need help most.

To help improve the support experience, we are excited to introduce a new Remote Access Solution for Sage X3 and Sage 500 clients.

The Challenge We Set Out to Solve

When an urgent support issue comes up, every minute matters. But the process of getting connected can sometimes slow things down.

Coordinating VPN access, configuring MFA, waiting on IT approvals, and working through internal queues can delay the start of a support session. For time sensitive issues, those delays can add unnecessary stress and extend the time it takes to reach a resolution.

Introducing Our Remote Access Solution

To help remove those barriers, Net at Work now offers a subscription based Remote Access Solution powered by ScreenConnect, a secure remote access platform designed for efficient support and troubleshooting.

This solution creates a streamlined connection between our support team and your environment while maintaining strong security, transparency, and control. Instead of waiting for access coordination each time support is needed, our team can connect more quickly and begin working toward resolution.

What This Means for You

Instant Connectivity – No more waiting on IT coordination just to begin a support session. Our support team can quickly connect, begin troubleshooting, and work toward a faster resolution.

Enterprise-Level Security – Your environment remains fully protected with AES-256 encryption and multi-factor authentication (MFA). Complete session audit logs are included as well, ensuring visibility, transparency, and compliance.

Reduced Support Delays and Costs – Faster access means faster troubleshooting. By reducing connection delays, we can help minimize downtime and improve support efficiency.

You Maintain Control Throughout the Process – Access is permission based. You can grant, monitor, and revoke access at any time, giving your team full control over your systems through the entire process.

Simple, Quick Setup – Getting started is easy and setup on your end takes approximately 15 minutes.

A Better Support Experience Starts Here

Support should begin with solving the issue, not untangling access roadblocks. With Net at Work’s Remote Access Solution, Sage X3 and Sage 500 clients can benefit from faster connection times, stronger visibility, and a more efficient path to resolution when support is needed most.

This solution is also part of our broader commitment to helping clients get more value from their technology investments. For both Sage X3 and Sage 500 users, Remote Access is included with the Client Technical Xperience Plans (CTXPs) and is also available as an add-on to our Business Intelligence Xperience Plans, also known as BIXPs.

Together, these offerings are designed to give clients a more proactive, connected, and confident support experience. Whether you are looking to reduce downtime, improve system performance, strengthen analytics, or make support easier to manage, Net at Work can help you get the most out of your technology.

To learn more about the Remote Access Solution, CTXP, or BIXP, contact the experts at Net at Work today.

Managing Tariffs in Sage X3

This blog explains how Sage X3 users can handle current and future tariffs within the system without requiring modifications or third-party solutions.

If the standard options don’t fully meet your needs for capturing tariff-related details, a custom solution or the Net at Work Surcharge Module (covered at the end of this blog) may be a better fit.

Purchasing Tariffs Design

Landed Cost with Complimentary Invoice Solution

Part 1: Supplier Cost Structure

Setting a product supplier cost structure with a cost type tariff in % to accrue at receipt.
1 Tariffs Sage X3 1024x555

2 Tariffs Sage X3 1024x399

GL Breakdown:

GL Account Debit Credit
Inventory 115
RNI 100
Tariff (Landed Cost) Accrual 15


Now you can see the value of the tariff on the PO:
tariffs in sage x3
Below you can see the value of the tariff on the Receipt:
tariffs in sage x3
On both the PO and Receipt, you can view the cost details per line:
tariffs in sage x3tariffs in sage x3

You can update the PO (before receipt) or receipt while receiving or after creation to change the value of the tariff by using the line’s “cost structure detail” to impact the accrual. Especially useful if the tariff has been canceled:
tariffs in sage x3

The receipt is valued including the tariff:
tariffs in sage x3

Part 2: Using Complimentary Invoices to offset the accrual from the custom broker invoice.

At creation of the complimentary invoice, select the line action menu “Pre-loading the line”:
tariffs in sage x3

  1. Enter the amount of the invoice. It can be higher or lower than the initial accrual
  2. Uncheck “New cost”
  3. Select the tariff cost

tariffs in sage x3

  1. Use the left panel’s “Receipt selection”, to select line on which the tariff applies:
    tariffs in sage x3

GL Breakdown:

GL Account Debit Credit
Tariff (Landed Cost) 15
AP 15


Note: Any variances from the amount accrued at time of receipt will automatically be reclassed from the accrual account to inventory or variance.

Pros of using Sage X3’s native functionality for tariff management:

  • Out of the box configuration, no modifications are needed.
  • Limited setup and training (especially on complimentary invoices to offset the accrued cost, which is slightly different from what clients are used to doing with a new cost).
  • Receipt accrual should be low variance for tariffs, as tariff rates are supposed to last several months.
  • Easy to update if there are changes in tariffs.
  • You can see the details on the PO and receipt “costs” tabs.
  • If a product is sourced from multiple suppliers from different countries subject to different tariffs, you can easily set a different percentage per supplier-product combination.

Con of using Sage X3’s native functionality for tariff management:

  • Out of the box functionality does not allow different landed cost types to have separate GL accounts. The landed cost account is designated on the product accounting code shown on line 73 in the image below.
    tariffs in sage x3


Part 3: Sales Tariff Design

Below are four distinct solutions available depending on how you choose to apply tariffs.

1.     Invoice Element Solution – Create an invoice element to add % to each invoice.

Pros of this method:

  • Straight forward.
  • Out of the box configuration, no modification required.
  • Can break out the value of the tariff on the invoice without giving too much information line by line.
  • Allows break out in the GL.
  • Can easily change percentage on a transaction-by-transaction basis.

Cons of this method:

  • Broad calculation based on the entire invoice of the order and not product specific.

2.     Price List Solution (Gross Price) – Increase your price list for the gross price calculation or create a tariff price list in percentage form for discount and charge to increase the net price.

Pros of this method:

  • Straight forward.
  • Out of the box configuration, no modification required.

Cons of this method:

  • It can be tedious to identify which product is subject to what increase.
  • If you don’t have Net at Work’s Price List Module, the update may be tedious.
  • No detail for your customer. Everything is merged into gross prices if you increase your gross price.
    • Workaround for this – A separate price list for tariff charges can keep details.

3.     Base Price Solution – Using the base price as the gross price in order to increase it by a tariff based on the last cost.

For example – Change the price list setup with a price processing set as the calculation:

  • [[F:ITM]BASPRI+0.15*[F:ITV]LASRCPPRI for a base price + 15% on last receipt cost.
    tariffs in sage x3

Pros of this method:

  • Straight forward.
  • Out of the box, no modification required.

Cons of this method:

  • Limited application to clients that use based price as their gross price.
  • No detail for the client’s customer, everything is merged into the gross price.
  • Once your last receipt cost is incremented by a tariff, it doubles down on the mark up.
  1. Charge / Discount Solution (based on the last cost)
  • Create a Charge / Discount dedicated price list based on the last purchase cost.
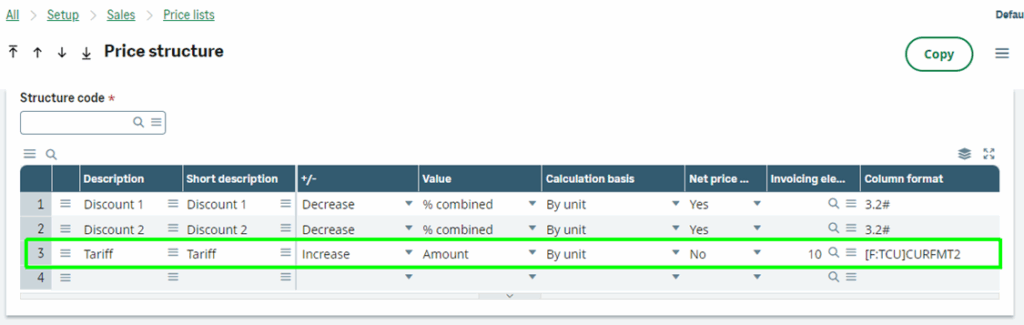
  • Update the price structure for an “adder” as Tariff and link to an invoicing element.
    tariffs in sage x3
  • Create a price list with no price value, just the tariff charge set to “yes.” This can apply to everything, including specific products and statistical groups for example.
    tariffs in sage x3


  • Next, export your products subject to tariff with their last receipt cost.
  • Add a column, in Excel, to calculate the value of the tariff, for example apply 15% on the last receipt cost, it could be different % per product if they are from different origins.
  • Import the price list with the product and that new column for the Tariff.
  • Tariff amount will be calculated based on price list and display at the sales invoice/order line level. It will also be posted back to the invoice element and a separate GL account.
    tariffs in sage x3

Pros of this method:

  • Relatively easy to implement.
  • Basing the tariff on the cost.
  • Can break out the value of the tariff on the invoice without giving too much information line by line. However, if you want the detail at the line level, then the structure can be changed so it is not linked to an invoicing element.

Cons of this method:

  • It’s not dynamic.
    • But this prevents future receipt prices from including the tariff.
  • The export, calculation and import to a price list can be cumbersome for some.
    • If you have manufactured products, the calculation of the tariff cost might be especially complex.
    • Have components from multiple sources with different tariffs.

5.     Charge / Discount Solution (% of Sales Price)

  • Create a Charge / Discount dedicated price list based on percentage of sales price.
  • Update the price structure for an “adder” as Tariff and link to an invoicing element.
    tariffs in sage x3
  • Create a price list with no price value, just the tariff charge set to “yes.” This can apply to everything, specific products or by statistical groups for example.
    tariffs in sage x3
  • The tariff percentage will be calculated based on a price list and display at the sales invoice/order line level but will be posted back to the invoice element and a separate GL account.

Pros of this method:

  • Easy to implement.
  • Out of the box configuration. No modification required.
  • Can break out the value of the tariff on the invoice at header level but also provide line level information as needed.
  • Allows break out in the GL.
  • Price list flexibility allows you to pick which products will have the tariff applied.
  • Can quickly modify percentages as they change.

Cons of this method:

  • Assuming products requiring the tariff are easily identified by product fields such as category or statistical codes.

Important to note: For solutions where the tariff uses invoice elements, changes to the invoice crystal report may be necessary to properly show the invoice element.

Part 4 – Net at Work’s Solution

Net at Work has developed a Product Surcharge module that has multiple applications capable of handling tariff configuration.

The module is required when:

  • You need to expand the cost structure beyond the maximum nine discounts and charges allowed when utilizing Sage alone.
  • You require or prefer a detailed breakout in the GL by surcharge as opposed to one landed-cost accrual account.

Benefits of the NAW Product Surcharge Module include:

  • Automated Surcharge Calculation: The module automates the calculation of surcharges based on predefined rules, reducing manual errors and saving time.
  • Flexibility in Pricing: It allows for flexible pricing adjustments, including percentage-based surcharges and fixed amounts, ensuring accurate cost management.
  • Enhanced Revenue Management: By incorporating surcharges, businesses can better manage revenue streams and account for fluctuating costs, such as commodity price changes.
  • Supplier and Customer Alignment: The module supports different surcharge rates for suppliers and customers, providing a cushion for price fluctuations and ensuring profitability.
  • Exception Rules: The module supports defining exceptions to standard surcharge rules, allowing flexibility in handling different tariff scenarios.
  • Comprehensive Reporting: Detailed reporting features help track surcharge applications and their impact on overall pricing and profitability.

Conclusion

We hope this week’s Sage X3 Insider Blog was informative and helpful for those of you managing tariffs in Sage X3.

If you have any questions or want to learn more about Net at Work’s Product Surcharge Module, please don’t hesitate to contact us. We’re always here to help.

Sage X3 Tips and Tricks: Making the Bank Field Mandatory in Payment Entry

When processing payments in Sage X3, maintaining accurate and complete data is essential. Even one small oversight, such as leaving the Bank field blank, can lead to incomplete records, reconciliation challenges, or reporting discrepancies later on. Fortunately, Sage X3 allows you to define which fields are required, ensuring that important details are captured before posting any transaction. 

In this week’s tip, we will show you how to make the Bank and Check Number fields mandatory during payment entry. This small change helps prevent errors and improves data consistency across all payment transactions. 

Step 1: Open the Payment Entry Transaction Setup 

From the main menu, navigate to Setup → A/P–A/R Accounting → Payment Entry  

Transactions. 

This screen displays a list of payment entry transaction types such as RECCH and PAYWT. Each transaction type determines which fields must be completed before a payment can be saved or posted. 

Screenshot example:
You will notice that “Bank” and “Check Number” are not selected as “Mandatory”. 
X3 Inside01

Step 2: Make the Bank and Check Number Fields Mandatory 

  1. Select the transaction typeRECCH (Check Receipts).
  2. In the list of fields, locateBank and Check Number. 
  3. Check the boxes in the Mandatory column next to each field. 
  4. Click Save, then select Validate to confirm the changes. 

Screenshot example:
After saving, you should now see checkmarks in the Mandatory column for both Bank and Check Number on the RECCH line. 

X3 Inside02

Step 3: Test the Change in Payment Entry 

Open the Check Receipts (RECCH) screen and begin entering a new transaction. When you attempt to save the record, you can see in the image below that Sage X3 will now require both the Bank Code and Check Number to be entered before you can continue. 

Undefined

Once you complete these fields, select Open Invoices from the left list, and then click the check mark on the right side of your screen to “Create”. Now you can proceed with your normal process to post the check receipts, either from the Payment screen or through Bank Deposits. 

Screenshot example:
This image shows the end result: A completed entry with both required fields filled in and now ready for posting. 

X3 Inside04
Step 4: Explore Other Fields You Can Make Mandatory 

If you would like to enhance data accuracy even further, return to the Payment Entry Transaction setup screen. Review the full list of configurable fields available for each transaction type and decide which ones should be mandatory based on your business requirements. 

This flexibility allows you to tailor Sage X3 to your organization’s internal control policies and data entry standards. 

Key Takeaway 

Defining mandatory fields in Sage X3 is a simple but powerful way to improve accuracy, prevent incomplete data, and strengthen internal controls. By requiring users to enter information such as Bank and Check Number before posting, you can ensure that every transaction meets your company’s financial and audit standards. 

Closing Statement 

Have a question about this tip or need help configuring Sage X3 for your business? Our Sage X3 experts are here to help. Contact us today to learn more. 

The Next Era of Sage X3: How Agentic AI and 2025 R2 Are Transforming Mid-Market Operations

When planners are still relying on spreadsheets to explain delayed shipments, or finance teams need three systems open just to answer a basic operational question, your ERP is no longer keeping pace with the business. 

That is the challenge many mid-market manufacturers and distributors are facing today. Traditional ERP automation helped eliminate repetitive manual work, but growing operational complexity now requires something more adaptive—systems that can analyze conditions in real time, surface risks earlier, and help teams act faster. 

Sage X3 2025 R2 introduces Agentic AI, Sage Copilot, and Supply Chain Intelligence to help mid-market companies move beyond basic workflow automation. The release focuses on improving operational visibility, accelerating decision-making, and reducing the manual effort required to manage supply chain, sales, and financial processes across the business. 

For companies already managing supply chain volatility, margin pressure, labor constraints, and growing customer expectations, this release represents more than a feature update. It reflects a broader shift in how ERP systems support day-to-day operations. 

Instead of waiting for users to manually search reports, reconcile disconnected data, or identify problems after they happen, Sage is moving toward systems that can proactively identify issues, recommend actions, and support faster operational decisions. 

Here is what that means for Sage X3 customers—and where Net at Work sees the biggest opportunities for mid-market organizations preparing for the next phase of ERP modernization. 

Moving From Basic Automation to “Agentic AI”

The biggest leap forward in the 2025 R2 and 2026 roadmap is the transition to Agentic AI. But what does that actually mean? 

Traditional AI or automation requires a human to trigger every step. Agentic AI possesses autonomy and reasoning. It can explore your data, choose between alternative solutions, execute multi-step orchestrations, and take direct action (create, update, or delete records) without waiting for constant human prompts. 

We are seeing this deployed across specific domains: 

  •   AP Automation Agent: Automatically captures document data, performs vendor and PO matching, and assigns GL codes based on learned patterns. 
  •   Supply Chain Agent: Runs “What If” scenarios to help you navigate disruptions before they impact your delivery timelines. 
  •   Sales Performance Agent: Continuously monitors your pipeline to flag declining order values or stalled quotes. 

Introducing Sage Copilot and the Sales Intelligence Agent 

At the heart of this release is Sage Copilot, featuring the new Sales Intelligence Agent. Embedded directly into your Sage X3 interface, Copilot uses natural language processing to act as a 24/7 assistant for your Sales Operations team. 

Instead of hunting through menus to find out why a shipment is late, your team can simply ask Copilot. The Sales Intelligence Agent automatically surfaces real-time insights, such as: 

  • Sales orders that are currently overdue. 
  • Shipments delayed in the past week. 
  • Customers showing a declining trend in order value. 
  • Overdue invoices that need immediate attention. 

Early feedback from the preview program has been overwhelmingly positive, with users noting that Copilot gives them the confidence to retire their legacy Excel workarounds completely. 

End-to-End Visibility with Sage Supply Chain Intelligence

For wholesale distributors and manufacturers, the gap between issuing a Purchase Order and receiving the goods is a massive blind spot. 

Sage Supply Chain Intelligence integrates natively with Sage X3 to close that gap. It allows you to collaborate directly with vendors in real-time, track milestone execution, and manage supplier performance over time. This means fewer stock-outs, less buffer inventory, and a much more resilient supply chain. 

Customization Without Compromise: Sage X3 Builder

A key reason mid-market companies choose Sage X3 is its powerful tailoring capabilities. The new Sage X3 Builder revolutionizes the developer experience, making customization safer and more efficient. 

Featuring a modern VS Code IDE and a native GraphQL API framework, X3 Builder allows developers to build brand-new web applications or mobile apps seamlessly. Furthermore, the new Automated Test Platform (ATP) ensures that any extensions or integrations you build meet stringent quality benchmarks before going live, preserving your ability to upgrade safely in the future.

Want to see how these features work in action? Watch our full on-demand webinar: From 2025 R2 Through 2026 & Agentic AI: Your Guide to the Next Era of Sage X3

Boost Visibility and Efficiency in Chemical Manufacturing with an Optimized ERP

The chemical manufacturing industry operates in a complex landscape of regulatory requirements, global competition, and volatile market demands. Success hinges on maintaining precise control over inventory, production processes, and distribution networks.   Modern Enterprise Resource Planning (ERP) systems optimized for chemical manufacturers provide the tools needed to navigate these challenges while optimizing supply chain operations. By implementing these solutions, chemical manufacturers can achieve unprecedented visibility and control across their entire supply chain, leading to improved efficiency, reduced costs, and enhanced customer satisfaction.

The Evolving Challenges in Chemical Supply Chains

Chemical manufacturers face a unique set of challenges that make supply chain optimization particularly critical. According to an American Chemistry Council survey, 86% of chemical manufacturers report that the overall regulatory burden has increased in recent years, with further regulation expected. These compliance requirements affect everything from formulation to storage, handling, and transportation.  Beyond regulatory concerns, chemical manufacturers must navigate:

  • Complex inventory management of materials with limited shelf lives
  • Hazardous material handling requirements
  • Lot and batch traceability demands
  • Global market pressures and price volatility
  • Increasing customer expectations for transparency and service

McKinsey & Company notes that chemical companies implementing digital solutions to transform their operations are seeing significant improvements in profitability and operational efficiency. However, achieving these results requires overcoming the inherent complexities of chemical supply chains.

Promo Banner Modern Erp Chem Rw

How ERP Systems Enhance Supply Chain Visibility

Modern chemical manufacturing ERP solutions like Sage X3 provide comprehensive visibility across all supply chain operations. This enhanced visibility manifests in several key areas:

Real-Time Inventory Tracking

Chemical manufacturers must maintain precise control over raw materials, work-in-process, and finished goods inventory. With a purpose-built ERP system, companies gain real-time visibility into inventory levels across multiple locations. This visibility enables more accurate forecasting, reducing both stockouts and excess inventory.  The McKinsey Chemicals Manufacturing 2030+ report indicates that an end-to-end integrated supply chain enables “reduced inventory across the value chain (including raw materials, intermediates, and finished goods) due to instant visibility of stocks.” This visibility creates opportunities to implement just-in-time inventory strategies and reduce working capital requirements.

End-to-End Process Integration

Chemical manufacturing involves complex, multi-stage processes that must be carefully coordinated. Modern ERP systems integrate these processes into a single platform, eliminating data silos and providing full visibility from raw material procurement through manufacturing and distribution.  This integration allows for better alignment with customer needs, faster response to market changes, and reduced lead times throughout the supply chain. McKinsey Chemicals Manufacturing 2030+ notes that an “agile supply chain coupled with segmentation reduces NWC requirements and improves market responsiveness.

Enhanced Quality Control and Traceability

Quality control is paramount in chemical manufacturing. ERP systems designed for the industry provide comprehensive traceability features that track materials through every stage of production. This traceability is essential for quality assurance, regulatory compliance, and efficient recall management if needed.

Streamlined Compliance Management

Chemical-specific ERP systems include built-in functionality to manage the complex compliance requirements facing the industry. Sage X3, for example, helps “simplify compliance: automate SDS management, ensure traceability, and manage restricted inventory with ease.” This automation reduces compliance risks while improving operational efficiency.

Promo Banner Innovate Thrive Chemicals Rw

Strategies for Optimizing Chemical Supply Chains with ERP

Implementing an ERP system is just the first step. To maximize the benefits, chemical manufacturers should adopt these proven optimization strategies:

  1. Implement an Integrated Supply Chain Approach

By connecting all aspects of the supply chain within a single ERP platform, chemical manufacturers can eliminate information silos and improve overall efficiency. This integration facilitates better coordination between departments and provides management with visibility into the entire operation.

  1. Leverage Advanced Analytics

Modern ERP systems incorporate powerful analytics capabilities that transform raw data into actionable insights. McKinsey reports that “advanced analytics approaches allow chemicals players to gain new insights into their production lines, revealing complex interrelationships.” These insights enable continuous improvement in supply chain operations.

  1. Automate Inventory Management

Automation reduces manual errors and ensures optimal inventory levels. For chemical manufacturers dealing with hazardous materials and limited shelf-life products, automated inventory management is particularly valuable. It helps reduce waste, minimize safety risks, and ensure regulatory compliance.

  1. Enhance Customer Service Through Self-Service Portals

Customer-facing portals integrated with your ERP system allow customers to view transactions, place orders, and track shipments independently. This capability not only improves customer satisfaction but also reduces the workload on staff.

Promo Banner Polycoat Success Story

How Polycoat Products Achieves Supply Chain Excellence

Polycoat Products demonstrates the transformative impact a well-implemented ERP system can have on supply chain operations. Since implementing Sage X3 with Net at Work’s guidance, Polycoat has grown from two locations to ten, with over one million square feet of manufacturing space and a nationwide distribution network.  H.K. Sharma, Vice President of IT for Polycoat, explains that their previous ERP system could not support their ambitious growth plans. “We began looking for our next long-term solution. We only had two locations then but had a long-term growth strategy that would require a powerful ERP that could scale.”  Polycoat now processes thousands of transactions weekly through Sage X3. Their annual audit process, which previously took three months of sorting through paper documentation, now takes just hours with electronic records. The system has also enabled more efficient inventory management across their expanded operation.  With Net at Work’s assistance, Polycoat is implementing a customer self-service portal and web store where “customers can view transactions, shop, and place new orders.” This enhancement will both improve customer service and reduce administrative workload.

“Polycoat Products’ annual audit process, which previously took three months of sorting through paper documentation, now takes just hours with electronic records.”

The Future of Chemical Supply Chain Optimization

The chemical manufacturing industry is increasingly focused on sustainability, digital transformation, and customer-centricity. According to McKinsey, by 2030, chemical companies using digital solutions will achieve significant benefits, including “maximization of profit per hour of processing plant by optimizing process parameters” and “minimization of cost and downtime associated with maintenance/repairs.”  The global chemical industry is projected to grow from $6.182 billion in 2024 to $6.324 billion in 2025, marking a year-over-year increase of 2.3%. Chemical manufacturers who invest in modern ERP systems now will be better positioned to capture this growth while maintaining operational excellence.

Take the Next Step Toward Greater Supply Chain Efficiency

Is your chemical manufacturing company struggling with disconnected systems, inventory challenges, or compliance concerns? Net at Work specializes in implementing Sage X3 ERP solutions optimized specifically for the chemical industry.   Contact us today for a complimentary Business Health Assessment to discover how our tailored solutions can transform your operations and help you achieve your business goals.